Show Posts

This section allows you to view all posts made by this member. Note that you can only see posts made in areas you currently have access to.


Topics - Night

Pages: [1] 2 3
1
While trying to resize the window while the character is "looking" around, the window fails to resize correctly and acts buggy.

Steps to reproduce:
  • use the 'look' command (L key)
  • resize game window

2
Modding / [URWME] Container Demo
« on: August 23, 2021, 10:35:59 PM »
Been making solid progress on implementing containers through modding, wanted to share what I have so far.

https://www.youtube.com/watch?v=rQQu_Ndc1kc

Designating an item as a container:
Code: [Select]
.TestContainer. "Hunting Horn" *COMMON* [effort:0] /0m/
[SKILL:CONTAINER]

Hotkey: Shift+O - Opens container menu

Supports multi item selection & send
Save & load item data to files, based on the containers item ID


3
Mod Releases / [URWME] SheepShearing
« on: March 11, 2021, 12:30:48 AM »
[URWME] SheepShearing

This is a very small mod I threw together to use in conjunction with URWME (Required), when near a sheep, allows the player to shear it for wool. Needs a bit of work as I didn't include requirements for shears, and I'm unsure about how much wool a player should be able to gather from one session. Additionally, I have no way (yet) of marking a sheep as sheared so it can't be re-sheared immediately, so some restrictive RP must still be used when using this as you'll still be able to shear the sheep indefinitely (and also sheep not owned by you).

Read !instructions.txt on setting up the menudef in your URWME_Config.txt file, or alternatively set it up in a regular menudef_ file.

Here is the recipe:
Code: [Select]
[SUBMENU_START:Animal Crafts]

.Shear sheep. "Hunting Horn" *HIDEWORKING* /2h/ [effort:2]
IsNearNPC(sheep);
{[TILE:IsNearNPC]} <Broad Knife> +'A sheep to shear'
HideWhenFalse();
[TYPE:skin]
[MATERIAL:wool]
[NAME:raw wool]
[TILEGFX:it-rawwool]
[WEIGHT:15]

[SUBMENU_END:Animal Crafts]

If someone wants to take this on as their own project feel free, as I'll be spending most of my time updating and improving URWME.

Ask questions or report bugs here, or on the URWME thread.

4
Mod Releases / [URWME] CulturalCrafts
« on: March 11, 2021, 12:23:14 AM »
[URWME] CulturalCrafts

This is a quick mod I threw together to use in conjunction with URWME (Required), utilizing IsNearNPC() I made a few recipes that allow the player to take a regular item, such as a spear for example, and give it to a nearby NPC to upgrade into their cultural equivalent. This should allow players to more easily acquire these items, but not so easy that you can just craft them anywhere, as you will need to be near a craftsman of the specific culture to craft a desired item.

Read !instructions.txt on setting up the menudef in your URWME_Config.txt file, or alternatively set it up in a regular menudef_ file.

Here are the recipes:
Code: [Select]
[SUBMENU_START:Cultural Crafts]

.Ango. *COMMON* [effort:0] /0m/ \2d\
IsNearNPC(Islander craftsman);
{[TILE:IsNearNPC]} <Rock> +'Islander craftsman'
HideWhenFalse();
{Spear} <Spear> [remove] +'a spear'

.Skramasaksi. *COMMON* [effort:0] /0m/ \2d\
IsNearNPC(Sartolais craftsman);
{[TILE:IsNearNPC]} <Rock> +'Sartolais craftsman'
HideWhenFalse();
{Hunting Knife} [remove] +'a large hunting knife'

.Kaumolais Knife. *COMMON* [effort:0] /0m/ \2d\
IsNearNPC(Kaumolais craftsman);
{[TILE:IsNearNPC]} <Rock> +'Kaumolais craftsman'
HideWhenFalse();
{Hunting Knife} [remove] +'a hunting knife'

.Kaumolais Spear. *COMMON* [effort:0] /0m/ \2d\
IsNearNPC(Kaumolais craftsman);
{[TILE:IsNearNPC]} <Rock> +'Kaumolais craftsman'
HideWhenFalse();
{Spear} <Spear> [remove] +'a spear'

.Northern Knife. *COMMON* [effort:0] /0m/ \2d\
IsNearNPC(-tribe craftsman);
{[TILE:IsNearNPC]} <Rock> +'Northern craftsman'
HideWhenFalse();
{Hunting Knife} [remove] +'a hunting knife'

.Northern Bow. *COMMON* [effort:0] /0m/ \2d\
IsNearNPC(Owl-tribe craftsman);
{[TILE:IsNearNPC]} <Rock> +'Owl-tribe craftsman'
HideWhenFalse();
{Long Bow} [remove] +'a long bow'

.Northern Spear. *COMMON* [effort:0] /0m/ \2d\
IsNearNPC(-tribe craftsman);
{[TILE:IsNearNPC]} <Rock> +'Northern craftsman'
HideWhenFalse();
{Spear} <Spear> [remove] +'a spear'

.Fisher's Knife. *COMMON* /0m/
IsNearNPC(craftsman);
{[TILE:IsNearNPC]} <Rock> +'Any craftsman'
HideWhenFalse();
{Knife} <Knife> [remove] +'a knife'

[SUBMENU_END:Cultural Crafts]

If someone wants to take this on as their own project feel free, as I'll be spending most of my time updating and improving URWME.

Ask questions or report bugs here, or on the URWME thread.

5
Suggestions / Version information in file properties
« on: February 16, 2021, 11:34:39 AM »
This doesn't really have anything to do with gameplay, so, more of a request than a suggestion. It would be helpful for third party modding purposes if I was able to acquire the version info via urw.exe's file properties:


Currently I am using news.txt and returning the first line with "Version", which suffices, but feels informal and potentially less stable over time.

Here is some information on C/C++ implementation;

https://docs.microsoft.com/en-us/windows/win32/menurc/versioninfo-resource
https://www.zachburlingame.com/2011/02/versioning-a-native-cc-binary-with-visual-studio/

Thank you for taking the time to read and consider our suggestions, as always, it is appreciated.

6
Mod Releases / [3.63] URW Mod Extender v0.0.3
« on: February 15, 2021, 06:43:53 PM »
[3.63] URW Mod Extender v0.0.3
(UnReal World Mod Extender)

This project is aimed at extending the capabilities of the current modding system and adding additional functionality to the game to provide players and mod makers with a much broader range of content than currently available. The scope of this project is quite large, with a variety of different byproducts resulting from its completion including QoL improvements to general gameplay, extended recipe syntax, events with scriptable conditions/actions, fully customizable hotkeys with assignable functionality, extended menudef_ handling, extended read/write of game data (player, npcs, items, world data), a lightweight C# wrapper for URW data management, and much much more as this develops.

In its current state, the project will start with an initial beta testing/bug fixing phase, whilst constructing the base minimum functionality to consider the project stable, useful, and fun for the player base to use, with little to no irritable drawbacks.

The initial beta release will be most appealing to current mod-makers who wish to extend their recipe's functionality and bypass the menudef_ limit, as there are no mods that currently make use of this(yet) there will not be many(if any) extended mods until they are made/tested/released as an extended mod.

Installation, running, exiting
Spoiler: show
Extract contents of the zip folder anywhere, but for easier management I suggest extracting it to your UnRealWorld folder. (mine is C:\Program Files (x86)\Steam\steamapps\common\UnRealWorld). After you extract URWME.exe and URWME_Files somewhere (must both be in the same folder), running URWME.exe will handle the rest. If the game is already running, it will use that instance of the game as its target process, if the game isn't already running, it will attempt to run the game in this order:
  • Current directory - runs urw.exe from the folder you ran URWME.exe in
  • Steam directory - Checks to see if you have steam installed via registry keys, then attempts to run the game from your default steam directory with the default game path
  • Steam shortcut - Attempts to run the game via URW's steam URL (steam://rungameid/351700)
Keep this in mind if you're using old game versions/non-steam directories. (designating path from URWME_Config.txt is planned for an upcoming patch)

To exit the program, either close UnReal World or the application itself through the main form. diy_ModExtender.txt and menudef_ModExtender.txt should automatically be deleted when this happens, but incase they don't, it is recommended to manually delete them.


Assigning and using extended menudefs
Spoiler: show
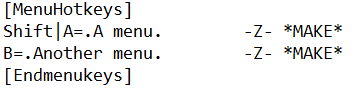
Extended menus can be assigned inside of the URWME_Config.txt file; to do this, simply open the file in notepad and insert the what you would normally put in a Menudef_ file, under [Menuhotkeys] on a new line.

The only additional bit you will need to add is the key / key combination you would like to use to activate this particular menus when using the Menu Manager. Below is an example of how this section of the config will look:

When accessed in game via the Menu manager, (~ key by default) you will be presented with a UI showing you the menudefs with their respective hotkeys, pressing the key/keys for the desired menu executes the following process:

  • key pressed ->
  • assigned keys menudef_ is written to UnReal World's folder as menudef_ModExtender.txt ->
  • mod extender macros the appropriate keys to reach the menu (shift+m+z) ->
  • menu manager is minimized and the menu is now open with affiliated diy_ recipes.

Here is what the UI looks like with the above configuration:

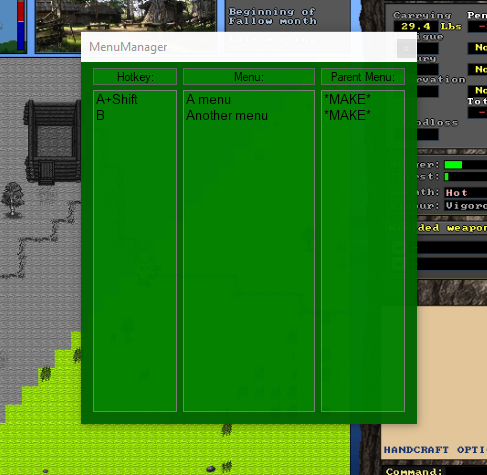
Make sure the menu manager is focused/active when you're attempting to access a menu. (by default, it opens focused)

Important Idiosyncrasies:
Any menu you add as an extended menudef to the config, should not be defined in a regular menudef_, and should not use  hotkeys used by regular menudef_ menus, as this will conflict when menudef_ModExtender.txt is written to. Any custom menudef_ defined within the config file may ignore this rule and use the same key. (-Z- was used in my example). Defining recipes for the menu may be done in either regular diy_ files or custom ext_ files.


Defining ext files & using new syntax
Spoiler: show
ext_ files work exactly like diy_ files, except they're processed into a master diy_ModExtender.txt file whenever the user is about to use the crafting menu. When the crafting menu is accessed, a function is triggered that reads each ext_ file defined within UnReal World's folder, the recipes are organized into a dictionary of submenu's and their respective recipes. each submenu is iterated through and each recipe within that submenu is read line by line checking for extended functions. When a line contains one of these extended functions, that particular function is executed and returns a true or false value, depending on whether the conditions of that functions were met, or not, which in turn determines if the recipe has all the requirements needed to use it. Multiple functions can exist within a single recipe, creating a much richer crafting system with more complex concepts and ideas emerging with each new function I am able to add and implement.

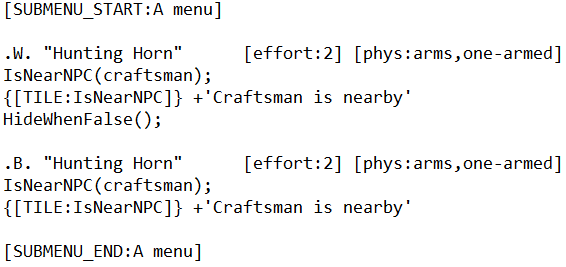
Here is an example of what an ext_file.txt looks like:


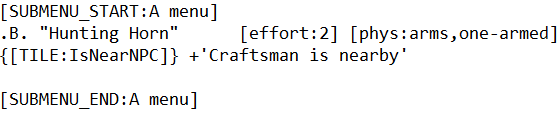
Here is the resulting diy_ModExtender.txt file after the functions have been executed and handled:


The current functions implemented consist of the following: (green fully working, yellow WIP)

  • IsNearNPC(string Name); - returns true if an NPC within 1 square has the designated text within their name
  • RecipeKnown(string Name); - returns true if an item with the designated name has been set as a 'recipe' via the [SKILL:recipe] tag (used to restrict an item if a recipe has not been learned yet)
  • RecipeUnknown(string Name); - returns true if an item with the designated name is not found/has not been set to a 'recipe' using the [SKILL:recipe] tag (used to 'learn' a recipe)
  • HideWhenFalse(); - removes the recipe from the crafting menu if any custom syntax is false, otherwise the recipe is shown.
  • {[TILE:FunctionName]} +'Descriptor' - any [TILE:] placed right after a function with the function name as the tile will act as a placeholder for the crafting system to use. This line gets replaced by a passing or failing requirement depending on its relative functions success or failure. Additionally acts as a descriptor for the function
  • [SKILL:recipe] - designates this item as a recipe, when a recipe is found in the players inventory or on the ground it is automatically removed from the game. Using RecipeUnknown(name) with the recipe's name as the parameter will hide the recipe once it has been crafted/learned for the first time when used in conjunction with HideWhenFalse(). Currently I have not implemented an 'unlearn' function yet, but it is a possibility if requested/needed.
  • PlayerIs(string variable, string comparator, string value); - returns true if the variable compared using a specified comparator with the value is true. Example: PlayerIs(Fatigue,>=,20) (partial implementation/untested)

Unimplemented but planned functions include:
  • WorldIs(string variable, string comparator, string value); - same as PlayerIs(), but for world data.
  • LastInputIs(string variable, string comparator, string value); - same as PlayerIs(), but for custom player input.

Important Idiosyncrasies:
All functions and data are case-sensitive, functions must end with );. Parameters are separated with a , with no spaces IE: (param1,param2,param3) spaces will be considered part of the parameter if you use them (which may be necessary, in some cases). Most functions require a [TILE:FunctionName] tag to be used on the next line as a placeholder ingredient, with the exception of a few special cases (so far, just HideWhenFalse();)


I have attached an example mod to be used with the Mod Extender for demonstration/learning purposes, includes IsNearNPC, RecipeKnown, RecipeUnknown, and [SKILL:recipe] usage. If you have any questions please post below.

Version History:
  • v0.0.3 3/10/21
    - Added functions: RecipeKnown(), RecipeUnknown(), [SKILL:recipe]
    - Automatic removal of items marked as a recipe from ground and inventory.
    - Automatically move files from Images\truetile to URW's truetile folder (does not overwrite)
  • v0.0.2 2/~/21 - Improved UI, improved game detection/start, organized folders/files
  • v0.0.1 2/15/21 - Initial beta release

Please report any bugs to me via this thread, my PMs, or contact me directly on steam:
https://steamcommunity.com/id/Nightipoo/

Download attached to thread.

Credits:
   Night - Creator/Programming.
   Jiggie - Reviewing code.
   Unrealworld.fi/forums - Multiple ideas from multiple forum users.
   Enormous Elk - Unreal world.

Requires Microsoft .NET Version 4.6 or later. (Usually already installed)

7
Solved'n'fixed bug reports / [Adjusted] Window size/location set to 0
« on: February 15, 2021, 11:38:40 AM »
Had a small power outage/surge tonight from the weather while I was running the game and my PC turned off, when I started the game back up the window size/position was set to what seemed to be 0,0,0,0. Minor inconvenience/annoyance, was able to right-click > window size/location to restore it. Unsure if this occurs when powering off regularly (holding power button, or whatever) or is a one time occurrence.

8
Off-topic / GME stock & government response
« on: January 29, 2021, 03:59:26 AM »
Just became aware of this recently. Some crazy stuff going on with GME stock and responses from google, the government, etc.
https://www.reddit.com/r/wallstreetbets/

Can scroll through to read more, I assume it will be trending for quite some time.
I've read multiple reports of them even selling peoples stocks without their consent.

9
Suggestions / Note taking
« on: December 09, 2020, 02:01:56 AM »
Some sort of way to write / read text would provide a nice way to roleplay note taking/journal writing for players. Lot's of ways to implement it so just thought I'd throw it out there incase you think it might fit well for UnReal World's setting in some fashion.

Maybe instead of text, Finnish symbols, or other marking methods.

Had the idea after reading a post on the old forums, in regards to players tracking hide spoilage and other time sensitive information.

10
Mod Releases / [3.71] [3.63] URWSSSelector v1.0.3
« on: December 05, 2020, 10:20:50 AM »
[3.71][3.63] URWSSSelector v1.0.3
(Start Spot Selector)

Simple mod that allows you to select your starting location with ease during character generation, simply start the program while unreal world is running and the starting location will follow your cursor. Map must not be zoomed in in order for co-ordinates to work properly. Right click to stop moving starting location and exit program.

Also make sure the game is in windowed mode while using this, fullscreen will cause issues when overlaying over URW. You can change it back to fullscreen afterwards of course.

Source included at bottom of thread if anyone is interested

Usage:


Instructions:
  • Run program during map generation screen (Make sure map is zoomed out)
  • Move cursor to desired starting location
  • Right click, exits program and leaves starting location at cursor
  • Middle scroll, changes search mode
  • Middle click, opens custom tile filter UI

Modes: (Mouse-Scroll)
  • Closest land - Closest land tile near your cursor
  • Closest village/settlement - Closest village to your cursor
  • Closest cave - Closest cave to your cursor
  • Custom - Closest tiles selected from list
  • High ground - Closest tile considered to be high ground
  • Dense forest - Closest forest tile

Version History:
  • v.1.0.3 10/21/21 - Updated to 3.70 stable; 3.71
  • v.1.0.3 - Minor bug fix with custom search locations, updated for 3.70b beta.
  • v1.0.2 - Added search modes, starting location tile information and selected mode now displayed in title bar, some performance upgrades.
  • v1.0.1 - Made map detection automatic, Start location is now set to the closest land tile from your cursors location in order to avoid starting in water, game version checking added, overlay is now 'invisible' to the human eye (opacity = 1%), added edge detection for starting location to avoid starting in tiles considered to be non-movable (invisible map wall).
  • v1.0.0 - Initial release

Please report any bugs to me via this thread, my PMs, or contact me directly on steam:
https://steamcommunity.com/id/Nightipoo/

Download attached to thread.

Credits:
   Night - Creator/Programming.
   Enormous Elk - Unreal world.

Requires Microsoft .NET Version 4.6 or later. (Usually already installed)

Source for study: [v1.0.0], [v1.0.1], [v1.0.2]

11
Mod Releases / [Tool] Character Designer v1.1.0b
« on: October 13, 2020, 06:58:31 AM »
[Tool] Character Designer v1.1.0b

A nice little tool that allows you to combine and layer different apparel for custom pc-male and pc-female sprite sheets.
Comes packaged with over 140 unique default sprites for designing your dream character.

Created by myself and @Krutzelpuntz who provided some amazing 8 direction sprites for this project, as well as testing for bugs and providing great feedback. Major props to him for his amazing work.

Menu:


Instructions:
  • Using the tool:
    By default, there are a variety of apparel items included in the tool for use, to begin start with a "Base" as your first layer. This layer represents your characters body, and should always be on the bottom of the list.

    Each layer type will contain apparel that you'll find on that particular layer:
    Spoiler: show

    When you're finished selecting what you'd like to add, click the add item button and it will add it to the list of layers on the left, where you can then move it on-top of or below other layers of apparel.


    The sprite sheet itself is automatically saved to the tools running directory as "TempSpriteSheet.png", you will need to rename this to "pc-male.png" or "pc-female.png" (depending on your characters gender), and then overwrite the original file in your UnRealWorld\truetile folder with the file generated by the program. As of 1.1.0, you may also use the save, and save as buttons.

    A couple of additional notes on check box options:
    • 8-Directional: Designates weather or not to generate the sprite sheet as 8-directions or 2. 8-Directional assets automatically generate 2-directional ones when this in unchecked. (meaning you can still use 8-directional sprites in 2-direction characters)
    • Add Fallen: Automatically generates the fallen pose for the sprite sheet.
    • Add Wading: Automatically generates the wading deep and shallow pose for the sprite sheet.
    • Add All 2Dir: Automatically generates a 2-directional sprite sheet from single 64x64 images (Not yet functional, fairly easy to add just lazy).

    Right click options:
    • Update Sprites: Checks the github's default sprite list for updates/new additions to the default sprites folder.
    • Goto home thread: Opens default web browser to this thread's page.
    • Goto fandom: Disabled for now.
    • Message developer: Opens default web browser to send a PM to @Night
    • Compiled BG Color: Allows you to set BG color of sprite sheet.

  • Adding new apparel to the tool:
    Adding new items for the tool to use requires only a small bit of configuration once you have the sprite you'd like to include. To begin, start by moving your new item to the "Sprites" folder, located in the tool's folder/directory. If you'd like, rename the file to something easier to organize amongst the rest of the sprites, otherwise continue on to the next step by opening Config.txt located in the tool's folder/directory.
    In the configuration file, you can scroll down to the section labeled [Sprites] (or just use cntl+F), where you'll be able to see the configuration data for the default sprites already included, to add your new sprite, simply label it in a similar fashion for example:

    My_Chestarmor_Blue.png=(Blue Scaled Armor,Chest,Scaled Armor,Iron,Blue)

    the format of this example being:

    Filename.png=(NameOfItem,Layer,Type,Material,Varient)

    note: as of 1.1.0, the beginning of the file name is a reference to its items, IE: Male_base, will only use Male_ labeled parts, where as Female_base, will only use Female_ labeled parts.

    The "Layer" parameter for configuration must be set to one of the following:
    Quote
    "Base", "Head", "Face", "Hands", "Arms", "Chest", "Waist", "Legs", "Feet", "Hair", "Beard"

    When you have your file in the sprites folder, and the configuration setup properly, save the config file and start/restart the tool and your sprite should now be loaded and ready to use.

Future goals:
  • Complete layer saving/loading
  • Bug fix for cropping height on bases with varying heights
  • Community contributions to the default sprite sheets, possible reorganization of file management system if sheets are plentiful.
Version History:
  • v1.1.0b 5/24/21 - Updated image hosting URL, hopefully more reliable than fandom.
  • v1.1.0 10/30/20 - Lots of new sprite's added and updated, Female base added, added right click options (update sprites, sheet background color, etc), added save and save as for compiled sheets, upgraded selection filtration for bases and their counterparts
  • v1.0.0 - Initial release

Please report any bugs to me via this thread, my PMs, or contact me directly on steam:
https://steamcommunity.com/id/Nightipoo/

Fandom homepage: URWCharacterDesigner Wiki

Download attached to thread.
(Only registered viewers may see downloads)

Credits:
   Night - Creator/Programming.
   Krutzelpuntz - Creator/8-Directional sprites, testing, constructive feedback.
   Enormous Elk - Unreal world.

Requires Microsoft .NET Version 4.6 or later. (Usually already installed)

>Source for study<

12
Gameplay questions / Quick question
« on: July 12, 2020, 05:13:14 AM »
Was glancing at some text I usually never read and was wondering what this is reffering to:


Is this an indicator of your current progress/xp towards the next level?

13
Thought up a way to do modding w/ file editing via HTML 5 & javascript, does anyone have interest in this sort of thing? Would be able to (probably) edit character stats, inventory, item data, map data, etc. Would be mostly intended for users not using Windows, as most of my windows based projects will be the basis of anything I'd be adding to this.

14
Gameplay questions / [Question] Max item limit per map tile?
« on: April 15, 2020, 04:55:41 AM »
Just wondering if anyone knows roughly how many items can be placed within a single area, as I've read earlier there is infact such a limit.

15
Modding / Generated map image
« on: March 23, 2020, 02:40:17 PM »
Just wanted to share this, was able to generate an image of the game map from data and save it to file, kind of neat to look at.

Landmark key:

TileID | Name |   Color
239 | Village |   Yellow
211 | Settlement |   Light Purple
210 | Fortified Village |   Red
86 | Settlement (2) |   Magenta
31 | Shelter |   Pale Mint
30 | Camp |   Orange-red
60 | Cave |   Brown

Warning: Map is 3073x2049 in size, hold shift to scroll left to right.
Spoiler: show

Pages: [1] 2 3
anything